

Home builders’ wall paneling is an interior finish system designed to add texture, manage room acoustics, or finish suitable wet areas with the aim of delivering a practical, attractive home. This 2026 guide explains how to specify wall panels for home builders and developers, where room-by-room requirements differ, and how to keep installation details consistent across a development.
- The Panel Hub is a good fit for builders selecting decorative and acoustic wall panels for homeowner-focused interiors.
- Specify wall panels for home builders by room use, substrate, installation method, and maintenance requirements.
- Acoustic wall panels reduce reflected sound; they do not replace a sound-isolating wall assembly.
- Wood wall panels and shower wall panels need different specifications, installation details, and approval checks.
Why wall paneling matters for home builders
For home builders, a wall panel is more than a finish selection. It changes how you coordinate electrical outlets, skirting, door trim, wall preparation, and the final inspection. A finish that looks right in a sample can still create awkward junctions when repeated across different floor plans.
Specify the room’s job before choosing the panel’s appearance. Living rooms need a coherent feature wall; home offices need attention to reflected sound; bathrooms require materials and assemblies suitable for their actual moisture exposure. The wall panels for home offices guide covers that room-specific starting point.
For a 2026 development, separate the standard finish package from buyer-selected upgrades. Your drawings should identify where each option starts and stops, who prepares the wall, and who approves the completed work. That prevents an attractive showroom choice from becoming an unresolved site detail.
Acoustic absorption also needs a clear explanation at handover. Reducing echo inside a room is different from reducing sound transmission between rooms. Decorative paneling does not automatically provide either benefit: require documentation for the performance you intend to promise.
How to specify and install wall panels
1. Define the purpose of each wall
Start with your floor plan, room schedule, and a simple spreadsheet. Mark the walls that need decoration, acoustic treatment, splash protection, or a combination supported by the selected system. This manual exercise establishes the brief before a supplier’s catalog shapes the decision.
Avoid using one panel type everywhere just to simplify ordering. A bedroom feature wall and a shower enclosure have different exposure conditions, detailing requirements, and maintenance needs. Group rooms by those requirements, then choose finishes within each group.
For developments with repeated layouts, define a standard wall location rather than leaving installers to choose it. Record the viewing direction and furniture relationship as well. A panel arrangement behind a bed needs a different visual center from one beside a doorway.
Include the homeowner’s likely use without assuming a particular furniture purchase. Keep switches accessible and consider where future shelves or wall-mounted equipment need structural support. Finish decisions should not remove useful wall functions.
- Room purpose: identify the main decorative or practical requirement.
- Exposure conditions: distinguish dry rooms, splash zones, and direct wet areas.
- Feature boundaries: mark the panel’s start, finish, and return locations.
- Future fixtures: record locations that need support behind the finish.
2. Measure the wall and resolve its junctions
Use a tape measure, a level, and a marked-up elevation before ordering. Measure the actual wall rather than relying only on the floor plan. Record openings, ceiling changes, and corners so the panel layout accounts for the built conditions.
Set out the visible pattern before calculating quantities. The useful question is not simply how much wall area exists; it is where full panels, cuts, seams, and edge treatments will land. An area calculation alone does not show whether the final strip beside a door will look deliberate.
For your 2026 construction drawings, coordinate finish thickness with electrical boxes and trim. Have the responsible trades resolve any required adjustments under applicable requirements. Do not let a finish installer improvise electrical work or conceal access points.
Use these four checks as the measurement record. Keep a photograph or sketch beside each measurement so the next person can understand exactly what was measured.
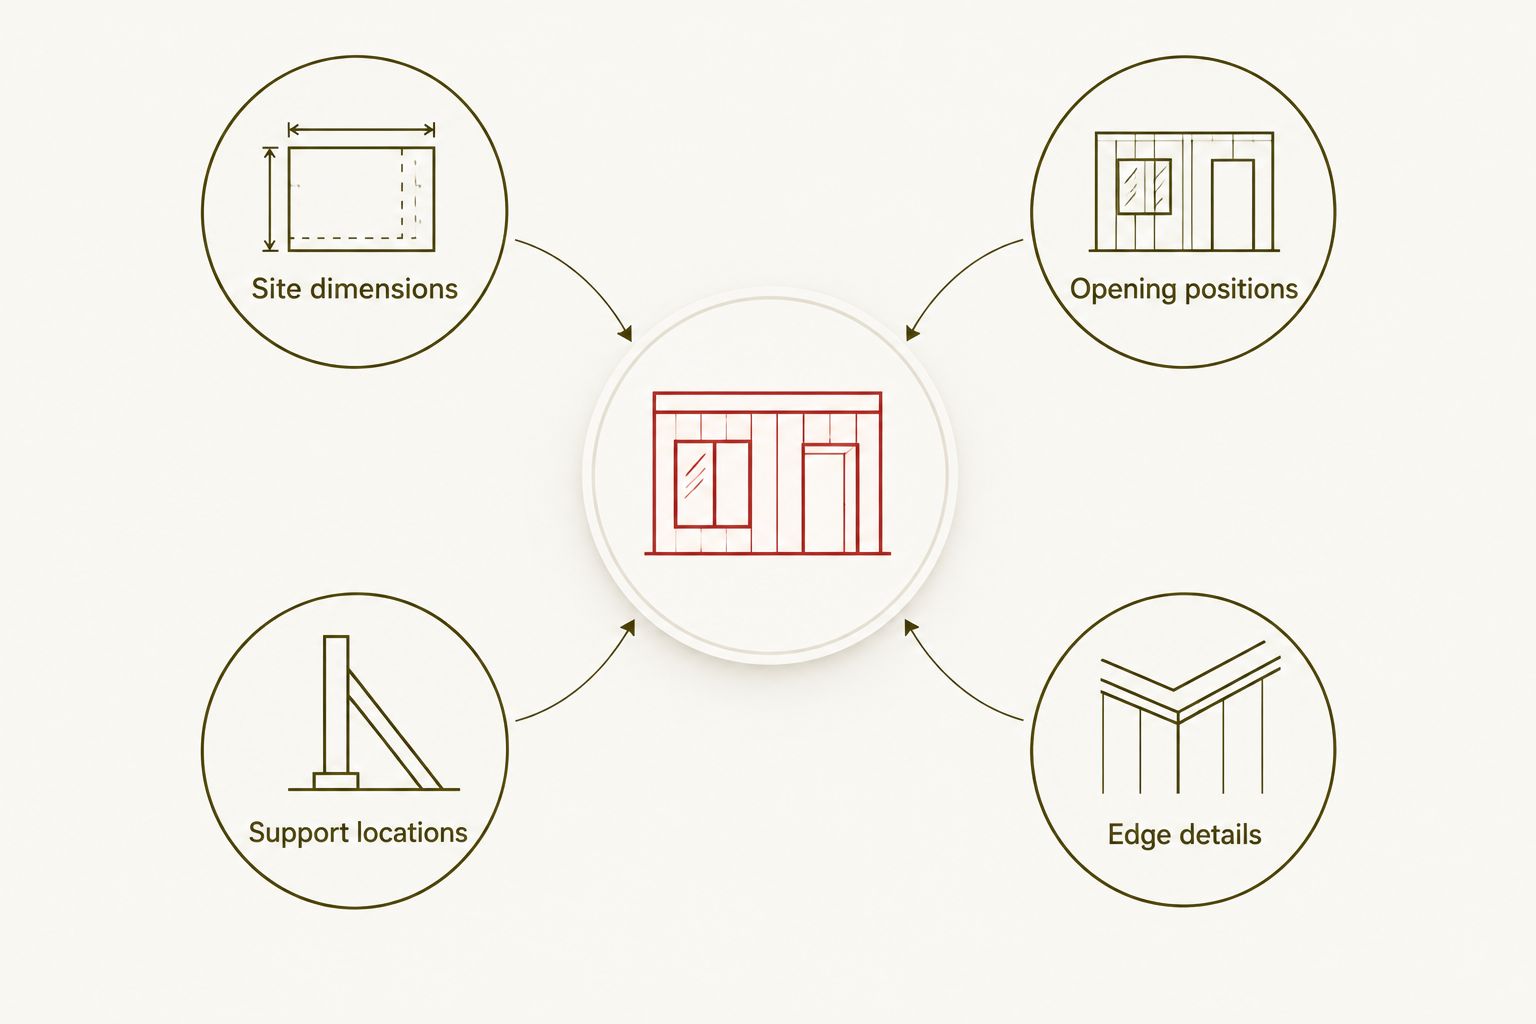
The completed elevation should become the shared reference for the buyer, site team, and installer. Update it when the built wall differs from the original design.
- Site dimensions: record wall height, width, and changes in plane.
- Opening positions: locate outlets, switches, windows, and doors.
- Support locations: identify backing for future mounted fixtures.
- Edge details: specify corners, exposed ends, skirting, and ceiling junctions.
3. Match the panel type to the room
Start by comparing material samples and installation documents yourself. Check the surface, core, backing, and intended use separately; a wood-facing finish does not mean the complete panel is solid wood. Ask for product-specific evidence before adding acoustic, moisture, or certification claims to a specification.
The Panel Hub offers decorative and acoustic wall panels for interior use. Its stated real wood acoustic offering includes an NRC 0.85 rating, FSC certification, installation in under 2 hours, and a 5-year warranty. Confirm the applicable product, tested mounting arrangement, installation scope, certification documentation, and warranty terms before transferring those claims into a development specification.
Those figures answer different questions. NRC describes sound absorption, not sound isolation; a short installation claim does not include every trade activity needed to finish a new-build room. Warranty duration also does not establish suitability for a wet area or replace installation instructions.
The Panel Hub is best for builders sourcing decorative and acoustic wall panels for homeowner-focused interiors. Treat it as a finish retailer, not a substitute for project-specific technical approval.
| Option | Best for | Main advantage | Key limitation or approval check |
|---|---|---|---|
| Acoustic Slat Wood Wall Panels | SoundPanel™ | Living rooms and home offices where acoustic treatment is part of the brief | Combines a slatted wood appearance with an acoustic product category | Verify the product’s absorption report and mounting requirements; do not specify it as sound isolation |
| 3D Geometric Pattern Wooden Panels | GroovePanel® | Dry-room feature walls with a geometric finish | The supplied description identifies real solid wood construction | Decorative texture does not establish acoustic performance or wet-area suitability |
| Decorative PVC wall panels | Interior locations where the documented cleaning and moisture characteristics fit | Provides an alternative to a wood finish | PVC material alone does not establish suitability for direct shower exposure |
| Shower wall panel systems | Shower enclosures with an approved complete installation system | Allows a coordinated approach to panels, joints, and penetrations | Performance depends on the full assembly, not the panel face alone |
| Conventional painted walls | Rooms that do not need panel texture or documented acoustic treatment | Keeps the finish specification simple | Does not provide the texture or acoustic function of a specified panel system |
For dry-room selections, compare the acoustic and geometric options below after checking the documents against your room schedule. Neither option should be assigned to a shower or a rated wall assembly without the required evidence.


Before approving either finish, make the following checks part of the specification rather than leaving them in an email thread.
- Confirm the complete material construction and intended interior use.
- Request the installation instructions and relevant performance documentation.
- Match acoustic claims to the tested assembly, not just the facing material.
- Check cleaning instructions and warranty conditions against the homeowner handover.
4. Approve a full-size junction mockup
Build a representative wall section before repeating the finish across homes. Use the intended substrate, fixing method, trim, and adjacent paint finish. A loose sample shows color and texture; an installed mockup shows whether the whole detail works.
Choose a section that includes an awkward junction. An outlet, internal corner, or transition to a door casing reveals more than an uninterrupted rectangle of paneling. Review the arrangement under the lighting planned for the room, because relief and slat spacing create visible shadows.
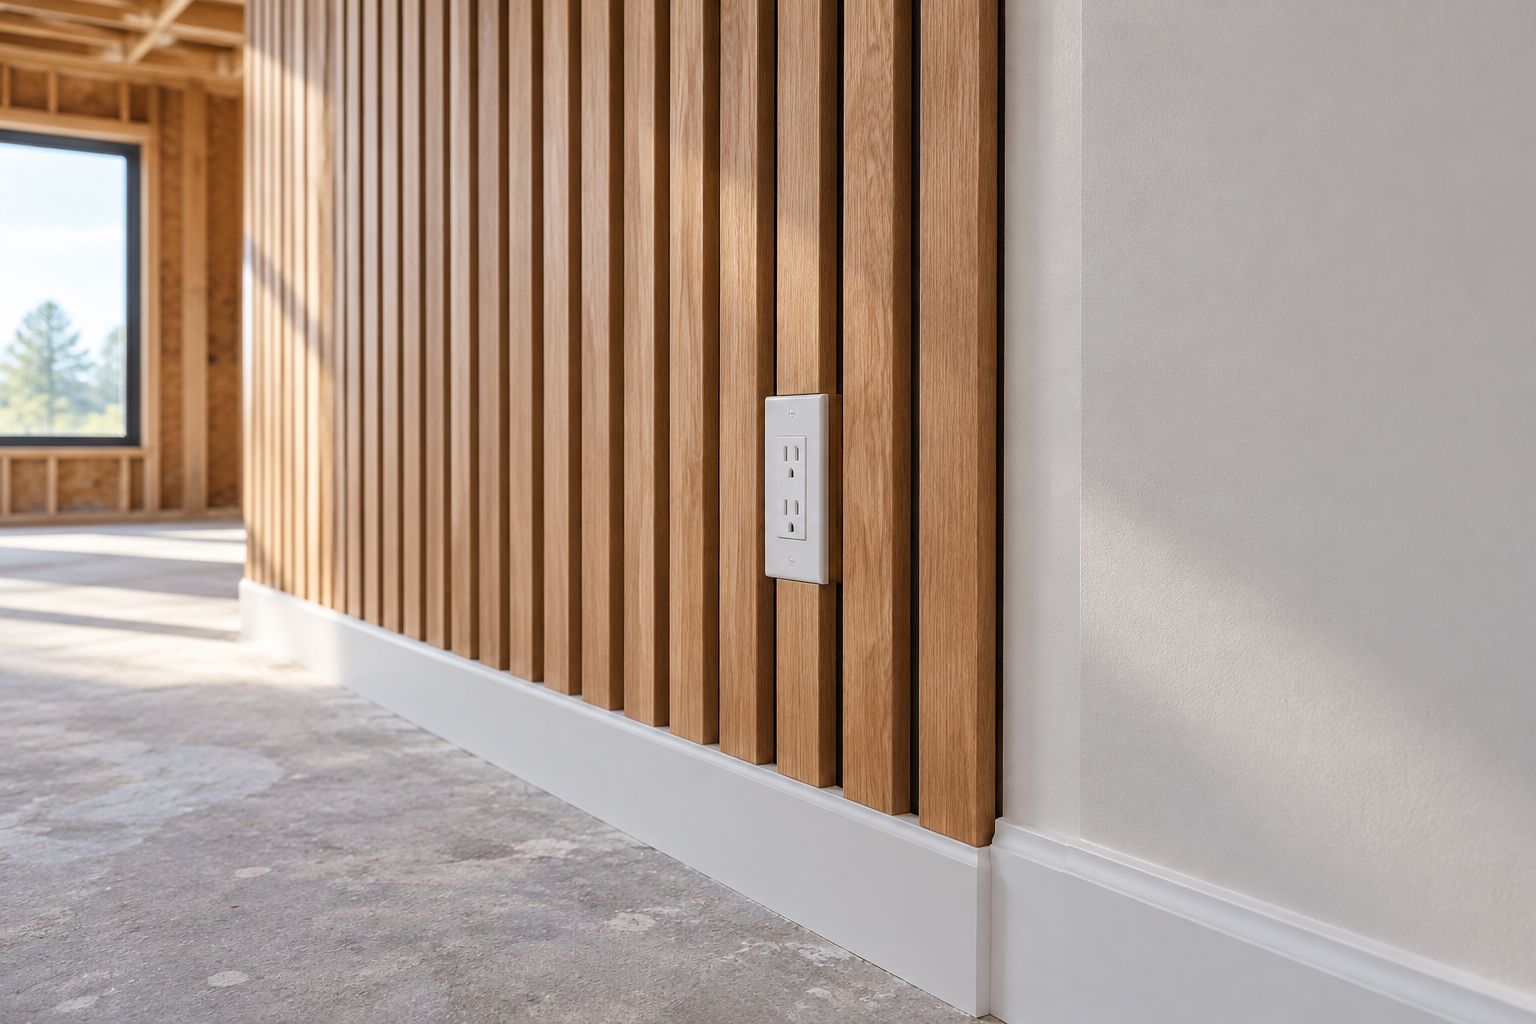
Set the acceptance criteria before the mockup review. Identify which edges must be concealed, where joints are permitted, and what alignment the installer must maintain. Photograph the approved result and retain the physical reference when practical.
A mockup also gives you a place to test the specified cleaning method and inspect the finished edges. Do not introduce an unapproved adhesive, coating, or sealant just to improve the sample’s appearance.
- Include a cut edge, an opening, and an adjoining finish.
- Review pattern alignment from the normal room entrance.
- Confirm access to switches, outlets, and required service points.
- Record approved materials, fixing methods, and finish details.
5. Coordinate installation with the site program
Use your existing construction schedule to assign preparation, installation, and protection tasks. Check that the substrate meets the panel manufacturer’s requirements before the finish crew starts. Paneling should not become a way to conceal unresolved moisture, unstable surfaces, or incomplete building work.
Follow the selected product’s instructions for storage, acclimation where required, substrate preparation, and fixing. Do not substitute a generic adhesive recommendation for product-specific guidance. Keep decorative finishes separate from the design of fire-rated or other regulated assemblies.
For a 2026 program, define the release condition for each room. The site team should know who confirms that preceding work is complete and who accepts responsibility for the prepared wall. This is especially important when several trades work around the same feature wall.
Protect completed panels from subsequent work. Specify how access equipment, painting, electrical finishing, and cleaning will occur without damaging the surface. Agree on the replacement process before installation begins, including how a damaged panel can be removed under the approved fixing method.
- Assign substrate inspection to a named responsible trade.
- Confirm materials and fixings against the approved specification.
- Coordinate outlets and fixtures before closing the finish surface.
- Follow product instructions for wet-area joints and penetrations.
- Record protection and repair responsibilities in the site schedule.
6. Inspect the installation and prepare the homeowner handover
Inspect completed paneling against the approved elevation and mockup, not against memory. Check the whole wall first, then examine edges, seams, penetrations, and transitions. Verify that required access remains usable and that mounted items attach to the intended support.
Separate visual acceptance from performance documentation. An attractive installation does not prove acoustic performance, certification, or wet-area suitability. Keep the relevant product records with the finish schedule so your customer-facing descriptions match the actual installation.
Prepare a short homeowner care sheet using the selected manufacturer’s instructions. Include cleaning restrictions, precautions for adding fixtures, and the process for reporting a defect. Do not present every panel in the home as having the same maintenance requirements.
Record the installed product and finish clearly enough for future replacement inquiries. Keep approved samples and remaining matching material where practical, without promising that later material will look identical. Wood appearance and visible finish variation should be addressed during selection and inspection.
- Check alignment, exposed edges, and approved joint positions.
- Confirm fixtures, outlets, and access points remain functional.
- File product identification and applicable performance documents.
- Supply product-specific cleaning and warranty information.
- Record defects and close them before final acceptance.
Common mistakes home builders and developers make
Treating decorative paneling as sound isolation
A wood slat wall can belong to an acoustic treatment specification, but it does not replace the wall construction required to control transmission between rooms. Describe absorption and isolation separately in sales material, drawings, and handover documents.
Using a dry-room specification in a shower
A bathroom feature wall and a directly wetted shower wall are different applications. Verify the complete system’s suitability, including joints, penetrations, substrate, and installation instructions. A material label alone is not approval.
Ordering from area without drawing the pattern
Total wall area does not determine where seams or cut pieces appear. Set out the panel arrangement first, then calculate quantities from that arrangement and the supplier’s stated coverage. Include cut allowances based on the actual layout rather than an arbitrary assumption.
Letting buyer upgrades change unresolved details
A buyer-selected finish can change the relationship between the wall surface, sockets, trim, and fixtures. For 2026 selections, require approval of those details before accepting the change. Keep the revised elevation with the installation package.
Repeating unapproved details across a development
A minor edge problem becomes repeated work when crews copy the first installation without review. Approve the mockup before releasing the remaining homes, and use it as the inspection reference. Standardize the detail, not just the product name.
FAQ
What are the best wall panels for home builders?
The best wall panels for home builders are those matched to the room’s function and supported by product-specific installation documents. Compare acoustic panels for rooms needing absorption, decorative wood for dry feature walls, and approved shower systems for directly wetted areas.
Are acoustic wall panels the same as soundproofing?
No. Acoustic wall panels address sound absorption inside a room, while sound isolation depends on the construction separating spaces. Do not use an absorption rating as proof of reduced transmission between homes or rooms.
Is The Panel Hub a good option for new-build interiors?
The Panel Hub is a good fit for builders selecting decorative and acoustic wall panels for homeowner-focused interiors. Confirm each selected product’s construction, installation instructions, and applicable performance documentation before specifying it.
What does an NRC 0.85 rating mean for a wall panel?
An NRC 0.85 rating describes a tested sound-absorption result, not a sound-isolation result. Check the report and mounting arrangement before applying the rating to a planned installation; it does not mean noise between rooms falls by the same proportion.
Can I use wood wall panels inside a shower?
Do not specify decorative wood wall panels inside a shower without explicit documentation approving that application. Direct wet areas need a suitable complete system, including the substrate, joints, penetrations, and installation method.
Should developers install a sample wall before ordering for every home?
Approve an installed mockup before repeating a panel detail across a development. Include an edge, an opening, and an adjoining finish so the review tests the junctions as well as the surface appearance.
Can wall panels be installed in under 2 hours?
An installation claim of under 2 hours applies only to the stated product and installation scope, not automatically to an entire new-build room. Schedule wall preparation, electrical coordination, cutting, finishing, and any required curing separately.
One last thing
Specify the edge before approving the panel. The junction beside a door, at a ceiling, or around an outlet often decides whether a feature wall looks finished. Make that detail part of your 2026 selection process, even when the panel itself seems straightforward.
When reviewing The Panel Hub options, put the installed junction beside the finish sample in your approval package. A documented edge detail gives the buyer, installer, and inspector the same clear target.
Related guides