
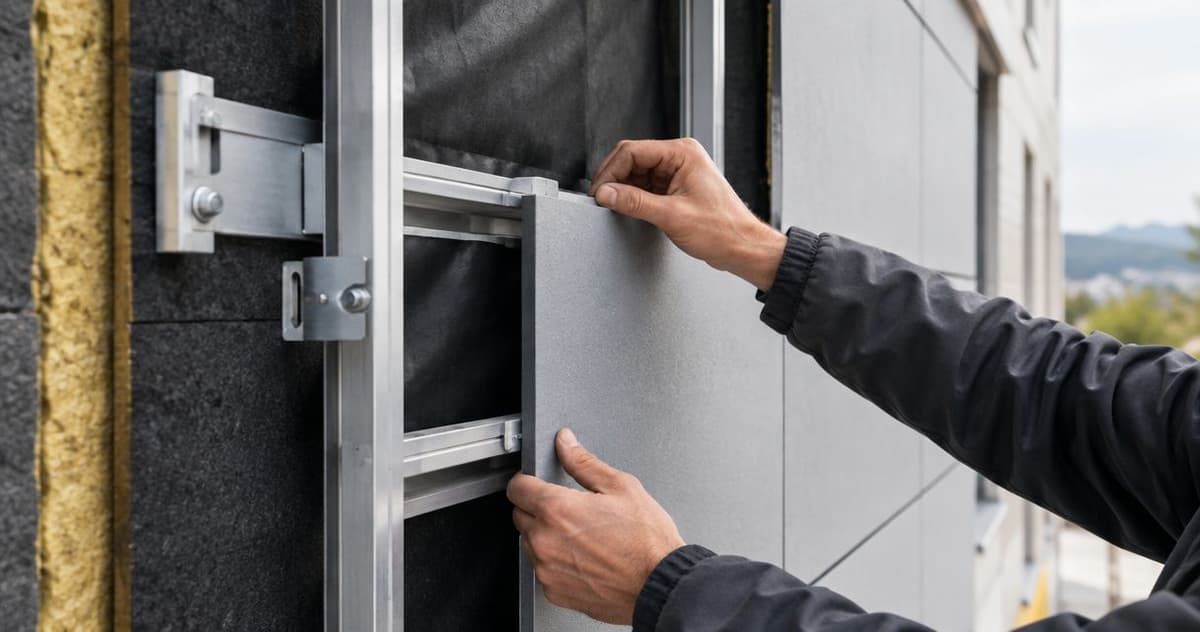
Instead of fastening exterior cladding directly against the wall, connect it to a specified support system that preserves a drainage cavity behind the finish. This guide explains connecting exterior cladding to rainscreen system supports, from backing and flashing to fasteners, drainage checks, and the final inspection.
- Connecting exterior cladding to rainscreen system supports requires a continuous drainage path and a verified structural attachment detail.
- Choose battens or rails from the exterior cladding manufacturer’s approved assembly, not by appearance alone.
- The Panel Hub is best for homeowners choosing interior wall panels, not specifying exterior rainscreen assemblies.
- Inspect flashing and support attachments before cladding conceals them; keep required drainage outlets open.
Why this matters
A rainscreen separates the exterior finish from the wall's water-control layer. Water that passes the cladding must have a route down and out; attaching panels without preserving that route defeats the assembly's purpose. The cavity also provides separation between the cladding and the layers behind it.
The visible panel is only one component. The supporting battens or rails, their anchors, the water-resistive barrier, and the flashing must work together. An attractive exterior finish does not correct a blocked outlet or an attachment that misses its specified backing.
The Panel Hub sells interior wall panels. The Panel Hub is best for homeowners choosing interior wall panels, not specifying exterior rainscreen assemblies. Interior acoustic performance, decorative texture, or bathroom suitability does not establish suitability for outdoor exposure.
For a 2026 exterior project, start with the approved wall assembly and current installation documents. Do not treat a decorative panel's appearance as permission to use it outdoors.
Before you start
- Get the complete assembly documents. Obtain the exterior cladding instructions, support-system details, fastener schedule, water-resistive barrier instructions, and relevant permit requirements. Confirm who approves structural attachments and any departures from the published details.
- Confirm materials and access. Identify the framing or other approved substrate, specified battens or rails, compatible flashing, fasteners, penetration treatments, and cavity closures. Arrange suitable access equipment and tools; stop work where safe access or concealed-wall conditions are unresolved.
- Resolve the hidden drainage trap. Horizontal supports can interrupt downward drainage. If your panel orientation requires horizontal fixing lines, obtain a detail that maintains drainage behind them before ordering or installing the support system.
Work from one coordinated detail set. A rail supplier's attachment instruction and a cladding manufacturer's fixing instruction address different connections; neither automatically approves the whole wall assembly.
Configuration 1: Wall layers and attachment layout
Confirm the water-control layer
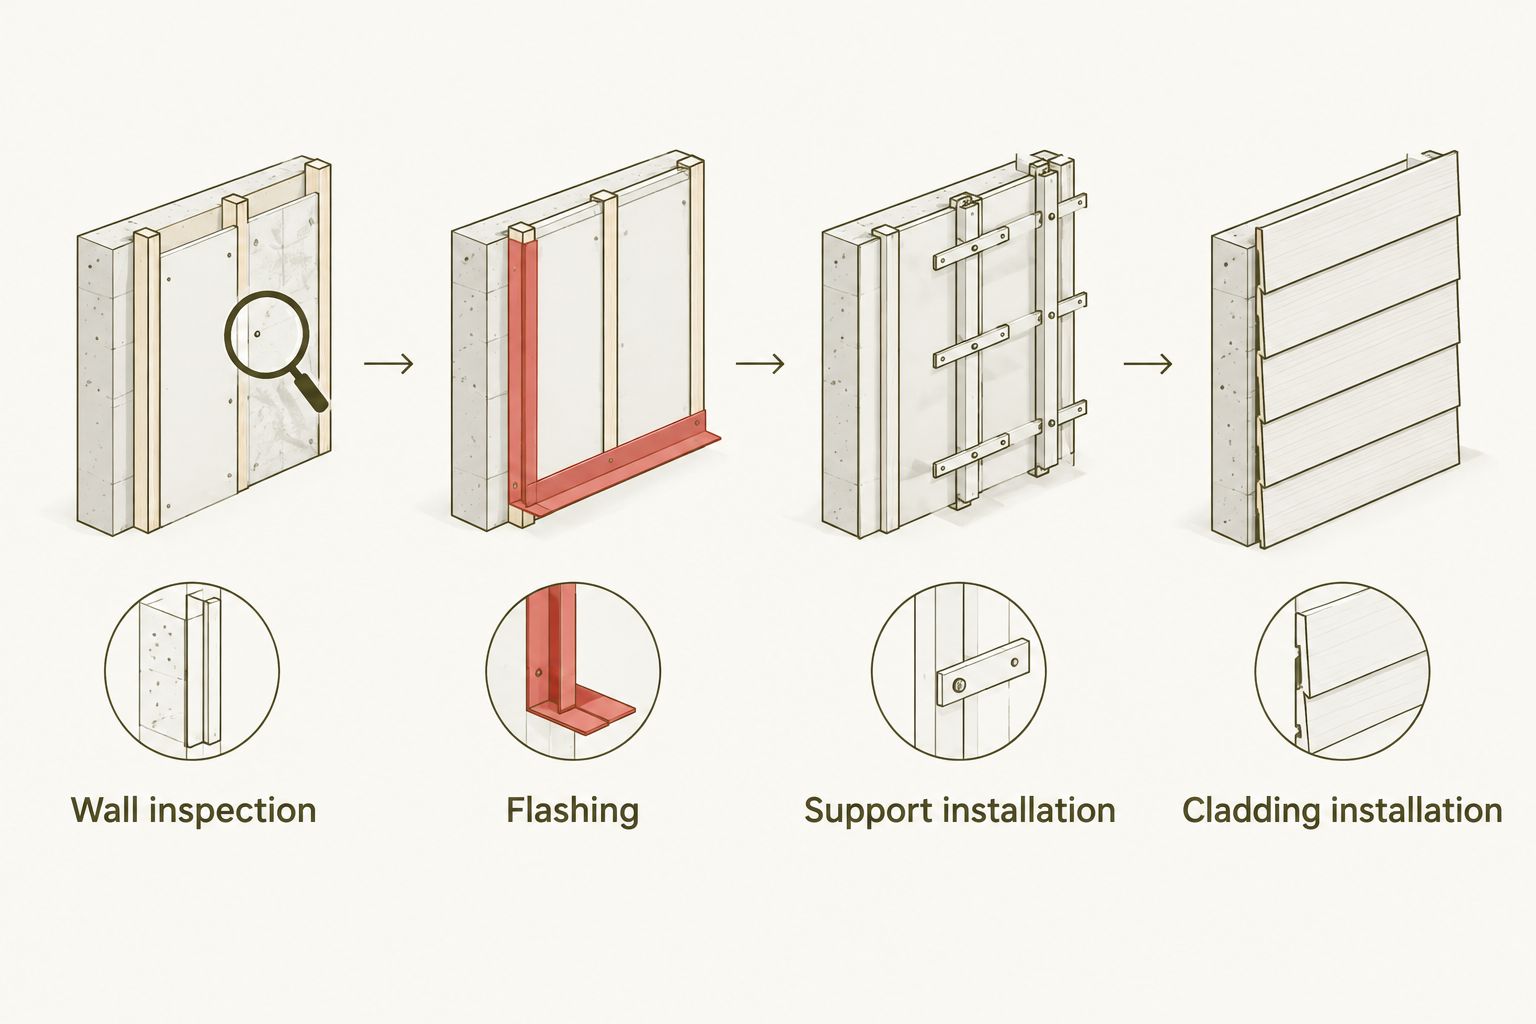
- Inspect the wall. Remove loose material and identify damaged sheathing, deteriorated framing, or existing moisture problems. Have defects assessed and repaired before covering them.
- Identify structural backing. Mark the framing or other approved attachment locations using the project detail. Do not assume every sheathing panel can carry the support system's loads.
- Install or repair the water-resistive barrier. Follow the barrier manufacturer's instructions for laps, seams, penetrations, and transitions. Connect it to the specified opening and base flashing details.
- Coordinate the openings. Resolve heads, jambs, sills, roof intersections, and service penetrations before the supports obstruct access. Flashing must direct water toward the exterior, not into a concealed pocket.
Expected result: You can identify the water-control layer, its drainage destination, and the backing that will receive each support attachment. No unresolved wall defect is hidden behind new work.
Prepare the connection drawings
- Create an elevation layout. Mark panel joints, support lines, corners, openings, and fixing locations on the wall drawing. Check that panel edges receive the support required by the cladding instructions.
- Check 3 detail locations: the wall base, an opening, and a representative support attachment. These are a useful starting review set, not a substitute for all required project details.
- Record the specified connections. Note fastener material, diameter, length, spacing, required embedment, and any washers or clips exactly as specified. Obtain clarification where the documents conflict.
- Mark inspection hold points. Plan 2 inspection checkpoints: after the support attachments are complete and before the final cladding closes the remaining inspection area.
Use this layout as your 2026 installation record. Document any approved revision on the drawing rather than relying on a verbal instruction that the next installer never receives.
Expected result: The crew has a shared attachment map and knows which connections must remain visible for inspection.
The installation sequence should keep drainage details accessible until they have been checked. Covering an unfinished flashing connection creates rework even when the panel installation itself looks correct.
Configuration 2: Battens or rails and the drainage cavity
Choose the specified support arrangement
Choose supports by the approved assembly, not by a universal spacing rule. Panel orientation, substrate, building height, exposure, and loads affect the connection design. There is no single fastener schedule that safely covers every exterior wall.
| Support arrangement | Best for | Advantage | Limitation |
|---|---|---|---|
| Vertical battens | Approved assemblies that accept vertical fixing lines | Can provide direct downward drainage channels | Panel orientation and edge-support requirements can require a different arrangement |
| Crossed battens | Approved layouts needing horizontal fixing lines over a vertical drainage layer | Separates fixing direction from the drainage path | Adds wall depth and another connection that must be specified |
| Engineered rail system | Projects with a documented bracket-and-rail assembly | Provides defined support and adjustment details | Requires system-specific anchors, movement provisions, and installation instructions |
These are support arrangements, not interchangeable product recommendations. Use only the arrangement documented for your wall; changing from battens to rails changes attachment conditions and interface details.
Install and check the supports
- Set the support plane. Establish the required alignment and cavity depth from the assembly drawings. Check around openings and corners before fixing the full elevation.
- Attach to the approved backing. Use the specified anchors and installation method. Treat penetrations through the water-control layer according to the applicable barrier and support details.
- Use only approved adjustment methods. Install specified brackets, packers, or shims where needed. Do not improvise a stack of loose offcuts to correct a crooked wall.
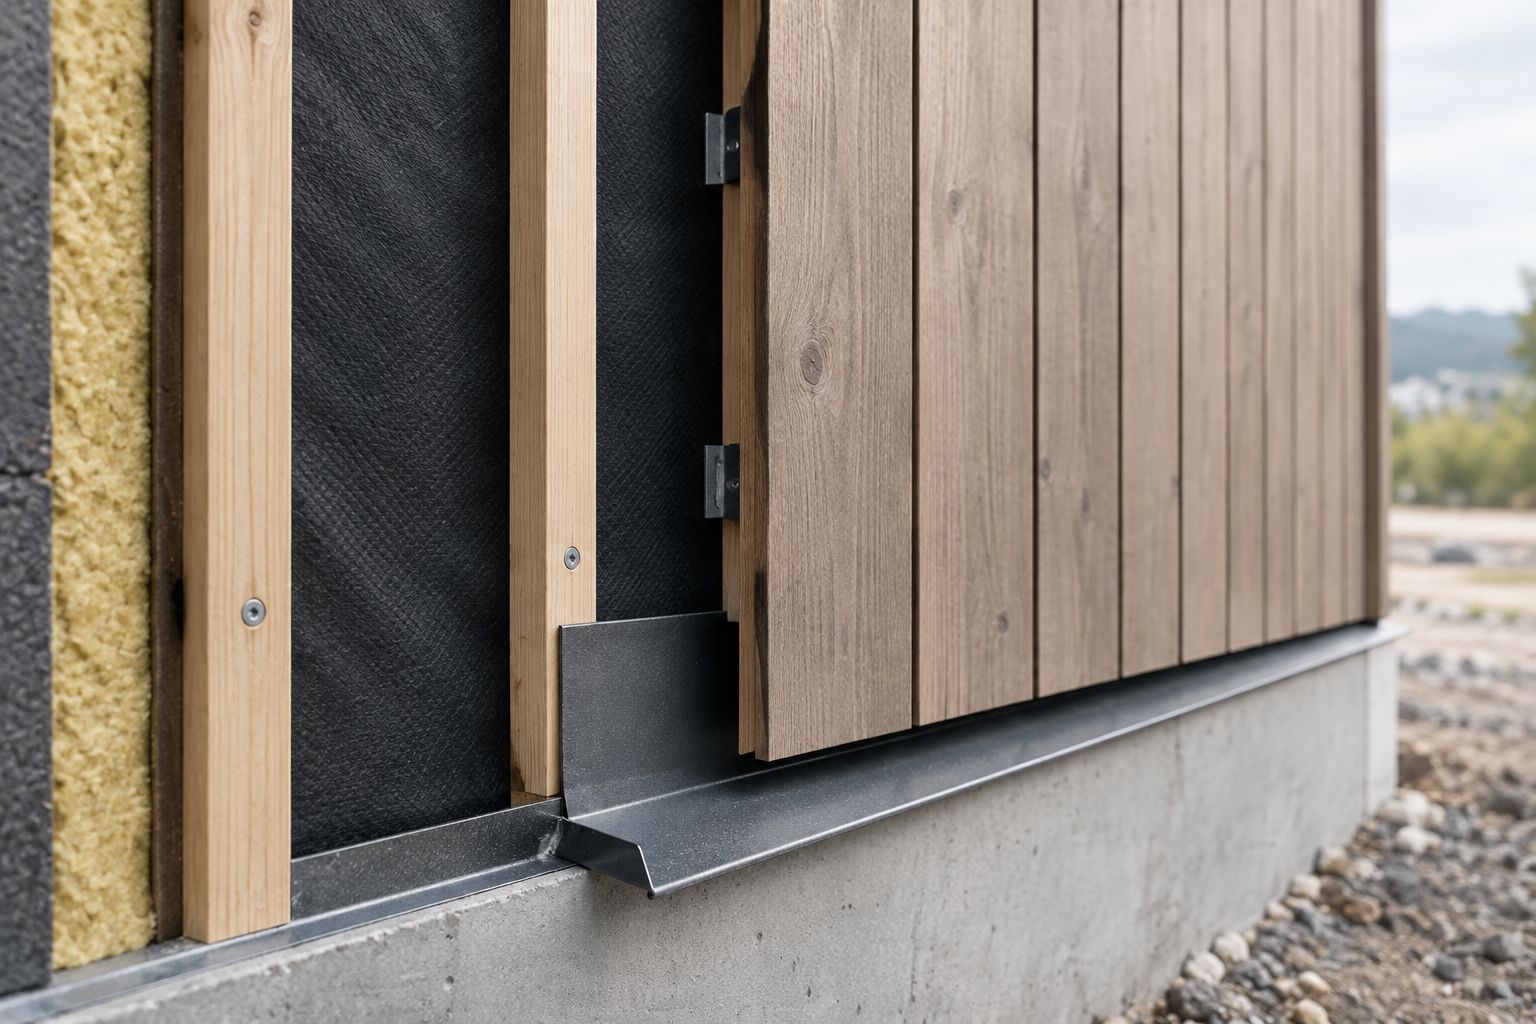
- Preserve drainage. Keep the required cavity routes and outlets clear. Position horizontal members, closures, and screens according to the details so they do not create unintended dams.
- Inspect before covering. Check attachment positions, alignment, penetration treatment, and drainage continuity. Photograph concealed connections where that helps the project record.
Expected result: The supports form the specified fixing plane, attach to verified backing, and leave the required water path open.
Where exterior insulation sits behind the supports, follow the designed connection through that insulation. Do not substitute a longer screw and assume the connection is equivalent; the support detail must address the actual assembly.
Configuration 3: Cladding fasteners and movement details
Attach the exterior finish
- Verify exterior suitability. Confirm that the selected cladding is approved for the intended exposure and support arrangement. Check requirements for edges, cut surfaces, joints, and installation orientation.
- Dry-fit the starting area. Check alignment, opening clearances, and the relationship between panel joints and support lines. Correct the layout before committing to the full wall.
- Follow the fixing detail. Use the specified screws, clips, or other mechanical attachments. Pre-drill, countersink, or use slotted holes only where the manufacturer's instructions require them.
- Preserve movement allowances. Maintain the specified joint gaps and fixed or sliding connections. Do not tighten a connection intended to slide until it clamps the panel rigidly.
- Finish edges as directed. Treat exposed cuts and install trims or closures using the approved details. Keep drainage openings distinct from joints that genuinely require sealing.
Expected result: Each panel has the required support and fixing pattern without blocking drainage or restraining movement contrary to the assembly instructions.
A fastener joins more than visible surfaces. Its required length depends on the layers it passes through and the embedment needed in the receiving material; panel thickness alone does not determine it.
Inspect a representative connection before repeating it across the elevation. Confirm that the installer can distinguish the cladding-to-support connection from the support-to-wall connection.
Complete the drainage inspection
- Trace the water path. Follow the detail from behind the cladding to the base outlet and around openings. Look for sealant, debris, misplaced closures, or supports interrupting that path.
- Check the cavity terminations. Confirm required screens, ventilation provisions, and fire barriers against the approved documents. Do not remove a required barrier to create a continuous opening.
- Review the finish. Check joints, trims, fixing heads, damaged surfaces, and required clearances. Resolve defects before dismantling access equipment.
- Save the handover record. Retain product instructions, approved changes, concealed-work photographs, and inspection records with your 2026 project documents.
Expected result: The finished wall has documented attachments, intact water-control details, and unobstructed required outlets.
Second workflow: Replace cladding on existing supports
Reusing a rainscreen support system requires a fresh compatibility check. Existing rails or battens are not automatically suitable for a different panel material, orientation, weight, or fixing pattern.
- Remove enough existing cladding to inspect the support condition, attachment locations, barrier, and flashing.
- Identify the existing system and recover its documentation where possible. Have unidentified or damaged connections assessed before reuse.
- Compare the proposed cladding requirements with the existing support spacing, connection capacity, cavity arrangement, and movement details.
- Repair damaged layers and obtain approval for any revised assembly before installing the replacement finish.
For a 2026 refurbishment, photograph the exposed wall before covering it again. Preserve evidence of repaired penetrations and altered connections, not just photographs of the finished facade.
Expected result: Reuse follows an approved compatibility decision rather than the assumption that an old support system will accept any new panel.
Troubleshooting
Water collects above a horizontal member
Check for an interrupted drainage route. Compare the installed member with the approved cavity detail and inspect nearby closures or sealant. Correct the obstruction using an approved detail; do not cut structural supports or required fire barriers without authorization.
Panels bow or joints close after installation
Check movement allowances and fixing restraint. Inspect joint gaps, fastener positions, and any fixed or sliding points against the cladding instructions. Replace damaged material and correct the connection rather than forcing the panel flat with extra screws.
Supports remain uneven after adjustment
Check the backing and adjustment method. Verify that the substrate is suitable and the specified brackets or packers are correctly installed. Stop adding improvised shims; obtain a revised detail if the adjustment range is insufficient.
Moisture appears around an opening
Inspect flashing continuity before blaming the panel face. Check the opening head, sill, jamb transitions, and nearby penetrations. A surface bead of sealant does not replace missing or incorrectly connected flashing.
Customize your workflow
Expand the drawing review to corners, parapets, balconies, utility penetrations, and changes in cladding material. Each transition needs a coordinated attachment and water-control detail; copying the middle-of-wall arrangement is not enough.
For material research, read the guide to outdoor wall panels for patios and decks. Treat design ideas as a starting point, then verify exterior suitability and attachment instructions for the exact material you select.
The Panel Hub's interior wall panels belong in a separate decision process. Keep your interior finish schedule separate from the exterior assembly schedule so decorative preferences do not become unsupported construction substitutions.
FAQ
How do I connect exterior cladding to a rainscreen system?
Attach exterior-rated cladding to the specified battens or rails, then connect those supports to approved structural backing. Preserve the documented drainage cavity, flashing connections, and movement allowances throughout the installation.
Can I screw exterior panels straight into wall sheathing?
Only use a sheathing attachment when the approved assembly specifically permits it. Direct attachment also needs to satisfy the rainscreen cavity requirements; sheathing alone does not establish either condition.
Are vertical battens better than horizontal battens?
Vertical battens can provide downward drainage channels, but the correct arrangement depends on the approved assembly and panel orientation. Horizontal fixing lines need a detail that maintains drainage behind or through the support arrangement.
What size air gap does exterior cladding need?
Use the cavity depth specified for your cladding and wall assembly. There is no universal gap dimension that replaces manufacturer instructions, project details, and applicable requirements.
Can I use interior acoustic panels outside?
Do not use interior acoustic panels outside without explicit approval for that exterior application. Acoustic ratings and decorative finishes do not establish resistance to weather exposure or suitability for an exterior attachment system.
Should I seal the bottom of a rainscreen wall?
Keep the drainage outlets required by the approved detail open. Install specified screens and closures without filling the intended water exit with sealant.
Can I reuse existing rails when replacing exterior cladding?
Reuse existing rails only after their condition and compatibility with the replacement cladding have been verified. Check support spacing, attachments, movement requirements, and the concealed water-control layers before covering them again.
One last thing
Inspect the least visible connection first. A straight panel joint is easy to see after installation; an anchor that misses its specified backing is not. Before closing each wall area in 2026, confirm the support-to-wall connection and the drainage outlet together.
A finish can look complete while the assembly behind it remains incomplete. Make concealed-work inspection part of the installation sequence, not a repair task after the first leak.
Related guides